Wednesday, September 17, 2014

Buckeyes!!!

Mmmm! Buckeye!!  The wonderful ohio treasure! I found an amazing simple recipe, but then I HAD to add more!  What follows is my spin on the ohio classic. 


Mix about 1.5 cups of peanut butter with 4 oz cream cheese, 1/2 stick of margarine, and 1lb confectioners sugar.  Mix until dough-like. Roll into 1 in balls between the palms of your hands.


Now pop em in the refrigerator over night, or if your inpatient like me, a couple of hours. 

Melt equal parts semi-sweet chocolate chips and heavy whipping cream and microwave on 30 seconds at a time until melted. Make sure to stir well after each microwave.

Once melted start dropping the balls in the chocolate.  One at a time, drop a ball in.  I like to use a fork and scoop it up and roll it around a bit.  Lift onto wax paper and refridgerate until chocolate is firm ( another hour or so).

And there you have it, a wonderful cheesecake like buckeye with a delicious soft chocolate covering. Enjoy!!!


Tuesday, September 16, 2014

Old tv console into new fish tank

Here is our wonderful fish tank!


I always knew I wanted a fish tank in our home.  I love the quiet hum from the filter and the soothing sights of the fish gently gliding back and forth.  I just didn't know how we were going to afford it?  

As luck would have it, we had been given an old working console television when we moved in.  We only had 2 small tv's between the two of us and gladly welcomed another working television.  As time went on, we had plenty of tv's and the console became banished to the basement.  Then I remembered seeing some amazing pictures of crazy fish tanks!  

With some hesitation, my husband and I began dismantling our old tv.  I would definitely recommend taking your time here!  The insides of these tv's can be VERY dangerous!  

Once it was torn apart, I have to admit, it sat around for quite some time before miraculously someone gave us the perfect size tank!  Back on track, we set the tank on some bricks and began to fill it.  The top became hinged to allow us some fishy maintenance.

Let me know what you think?? And please note, we are not professionals!


Monday, September 15, 2014

how to update kitchen cabinets

When we first moved into our home our cabinets looked like this....
Dark, shiny, dated wood cabinets with the scalloped valence over the sink.  All original! Our house was built over 40 years ago, so these bad boys had some wear and tear on em!  What did we do? Take a DEEP breath and start tearing things apart!!

We first removed all the hinges and handles, easy enough with a screw driver.  Be sure though, if your are doing this your self to keep track of which door goes where.  I used a pencil and lightly marked the location on the inside next to a hinge, to help keep it hidden.  My husband and I also took this opportunity to remove the valance, the scallop was easy but the trim over top ran the length of the cabinets.  With patience, it did come off in one piece and did not damage the cabinet box itself.

If you are feeling especially motivated, you can paint the inside of the cabinet box's.  We however did not feel this way.  I have to say, in my opinion 3 years later, I do not notice a difference.

Next we set up some saw horses in the garage, to make some make shift tables to lay the doors on.  Then we used small electric hand-held sanders to sand away the outside layer of grime and the finish on the cabinet doors.  This was the most labor intensive part of our journey!  Be patient! This part is worth it!  This is how you are going to get like-new cabinets with out paying the price for new ones!!

Once sanded, then we got our hardware ready, we had to move the handles from horizontal to vertical. so new holes had to be made and old one had to be patched with a wood filler and sanded again.

Now its time to paint!  We used to paint we had left over from painting the outside of our house, I'm not sure if that's the greatest idea, but again 3 years later, it still looks amazing.  It was an outdoor paint with an eggshell finish. We painted the outside of the cabinet box's and the door's.

It's time to attach the doors, we bought new hinges to match our new handles.  And lastly, we attached our crown molding with liquid nails.

I believe our update turned out really well!  We saved so much money by not buying new.  I hope this helps anyone that is looking to tackle this project.

*note: my husband and I are not and will never be a licensed contractor, we did this our selves and share our story for information only!  Please share your thoughts!!!

AFTER:


Friday, September 12, 2014

a little about me

Hi all,

I'm Jen. I am a mother of two wonderful baby girls and a wife to a wonderful husband.  We have a house full of animals and constant commotion.  I love our life! My husband is a science teacher at a junior high and I am a part-time pharmacy technician.  This scenario sets our young family up with the ability to always have one of us parents with our kids, but doesn't leave a lot for our pockets.

I have grown to love the challenge of improving our "fixer-upper" on a budget.  And that is what brings me to blog.  I think it will help me see everything we have done to our home and also share our fun with you!  So I hope you enjoy it as much as I do!

Bookcase redo

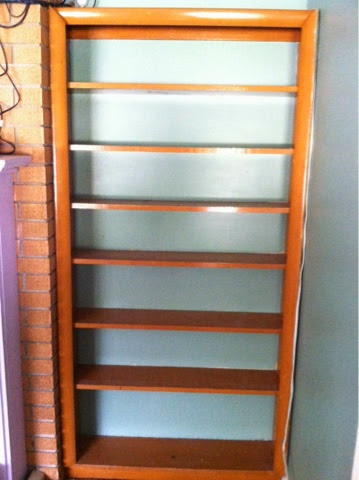
Here recently I became fed up with our dated bookcase. On a tight budget, I knew it would have to be a cheap redo! Hmm? So what to do?

Yep, pretty bad?!? Our house was built in the early 70's and there is a lot of this "shiny" trim/wood around.

So, I got out the hammer and ripped it all off, sanded a little, painted the shelves white. 

Now for my favorite part... I bought new trim! Home Depot has a beautiful door trim kit for 12.98. With a few nails it was beautiful again. 

To finish off the project, I bought a book of grey/black scrapbook paper and mod podged it to the back if the shelves! With a total of $20 ( we already had paint and mod podge) our bookcase was made beautiful again!